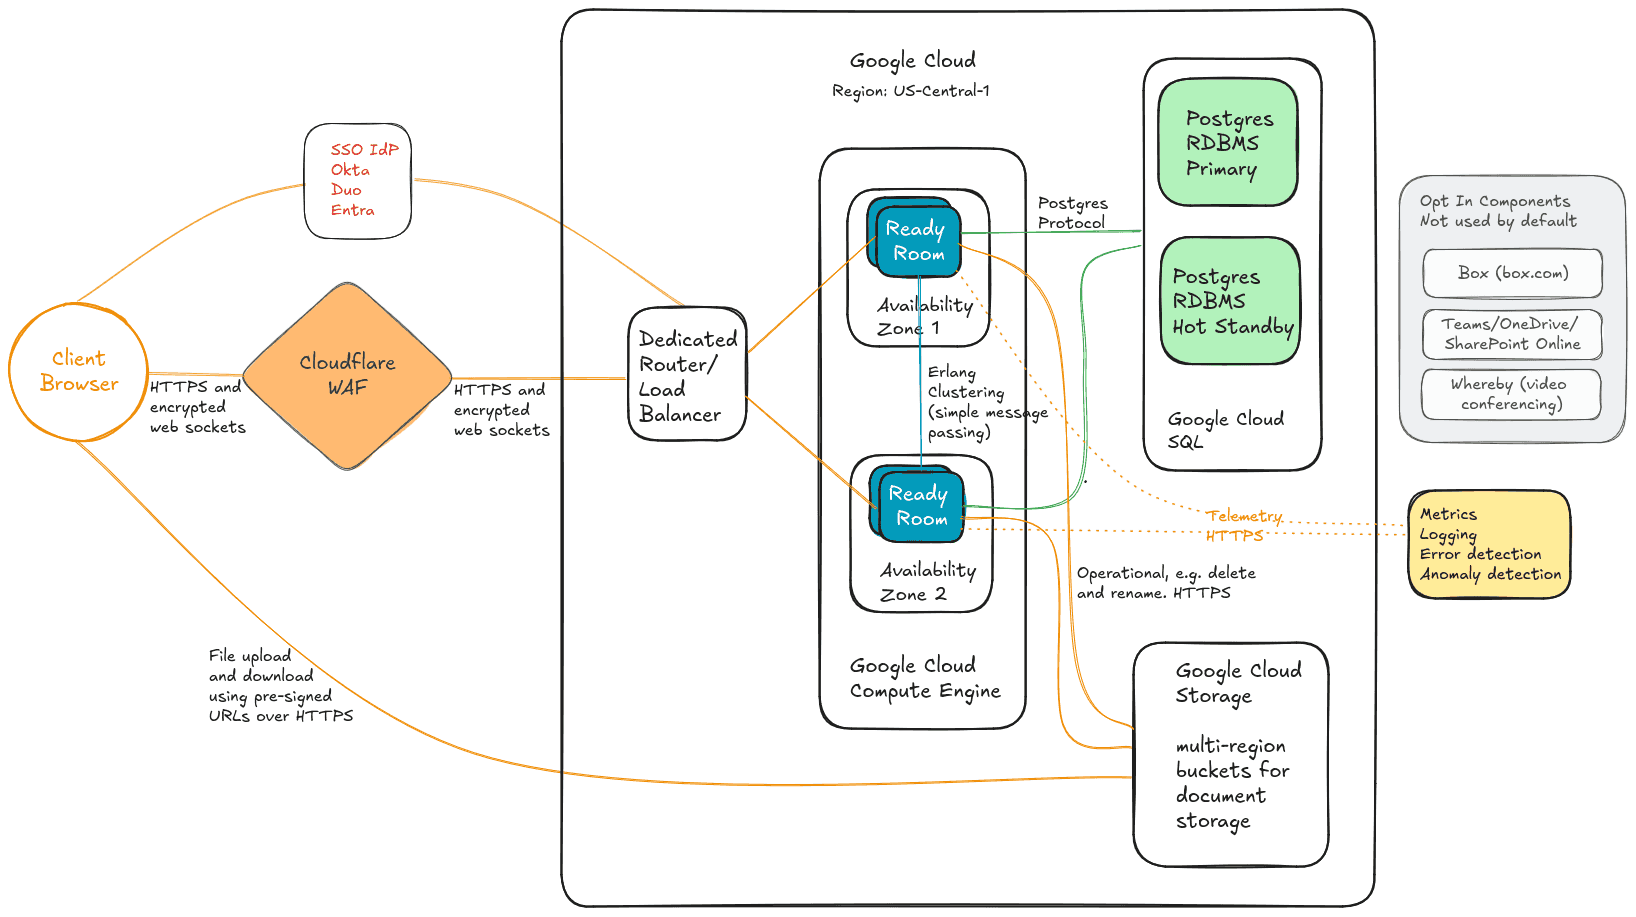
What a B2B SaaS provider really needs to know about implementing multi-IdP/multi-tenant single sign-on via OIDC
This guide is geared towards developers at a prototypical B2B SaaS company who have been tasked with implementing single sign-on (SSO). That is, you have a web-based application that provides a service to other businesses, and their users want to authenticate to your application via their identity provider.
You are not writing an app for internal enterprise use. You are not making an app that your customers install on prem and you are not providing a mobile or desktop application. In addition, your app maintains its own user store and may also allow non-SSO users to login directly. If this is you, read on.
OpenID Connect
Why use OpenId Connect (OIDC)? Why not OAUTH? What’s this I hear about SAML?
I selected OIDC simply because that’s what the identity providers I’m concerned with, Okta and Entra ID, say to use. It builds on top of OAUTH, it’s standardized, broadly supported, and relatively simple. There’s no reason to consider any other technology.
Actors
There are three parties involved in the authentication dance: your B2B SaaS company, your customer, and your customer’s identity provider (IdP).
For example purposes, we will need a dummy company. So the rest of this document assumes you make a customer relationship management (CRM) solution similar to Zoho or HubSpot, but better in some ineffable way. Your company name is Crummy, your domain name is crummy.biz, and your app is at app.crummy.biz.
Okta and Microsoft Entra ID (previously Azure Active Directory) are the leading enterprise IdPs—by far. No enterprise uses Google and, surprisingly, they don’t use Ping. YMMV. Of course, social login is right out, so no Facebook or LinkedIn or Twitter etc. We will focus solely on Okta and Entra. In fact, this guide is primarily a discourse on the differences between the two. It is assumed that you have a free account on both.
We’ll also need a couple of imaginary customers. The Entra customer will be Electra and the Okta customer will be Orestes.
Tenants
Your customer accounts, e.g. Electra and Orestes, are your tenants. They are also Entra’s and Okta’s customers and tenants. Each IdP manages a directory of users for each tenant (note, Okta may be configured to use AD as a directory, but that’s of no importance).
In order to sign into Crummy, a representation of the app also needs to exist in the IdP’s tenant.
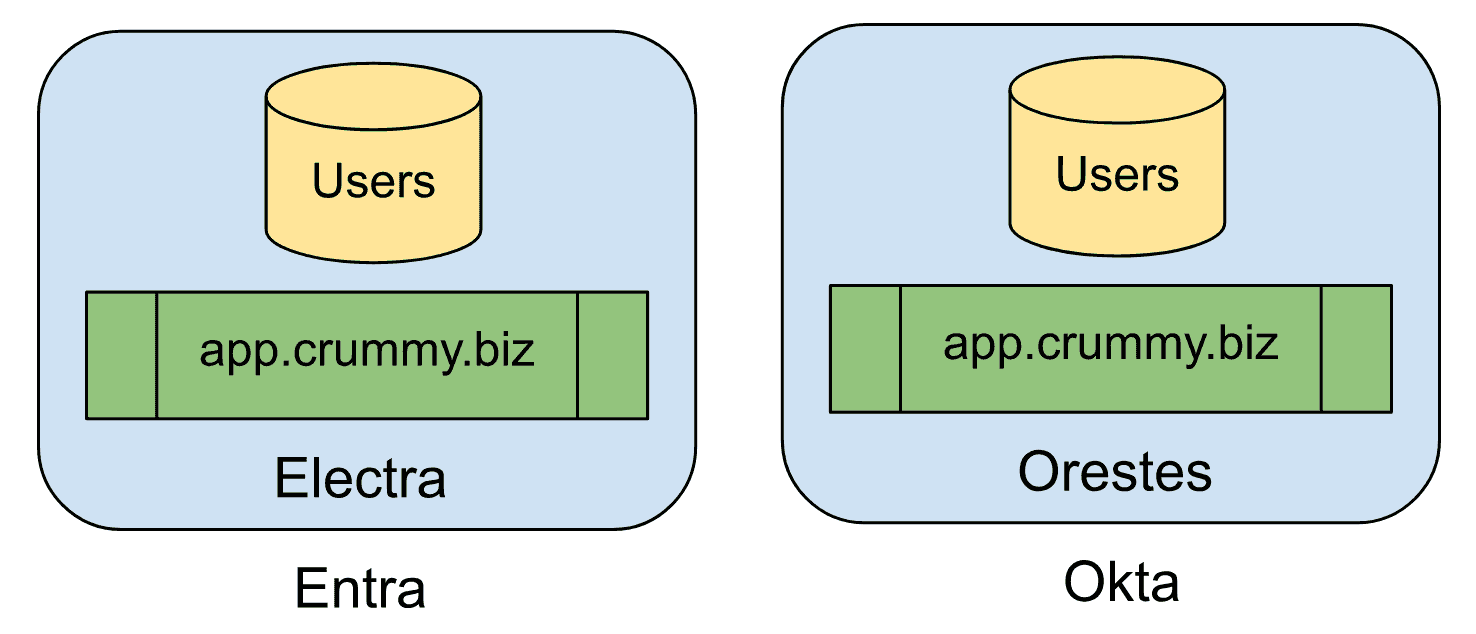
The first question, then, is how do you register your app with the IdP’s tenant? The answer is different for Entra and Okta.
Entra
For Entra, the best way to do this is to create an “application registration” (aka “application object”) in your Entra tenant. This is a description of your app with all the relevant callback URLs, logos, secrets, etc., that a customer can later “add” to their tenant.
The tenant-local version of your app is called a “service principal”, and it is what ultimately links a tenant’s users to your app. Customers can add the service principal to their tenant dynamically, the first time they authenticate to your app, or statically by selecting your app from the Microsoft Entra App Gallery.
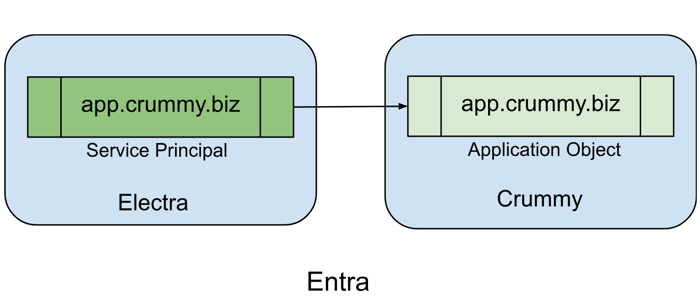
(You can, I suppose, ask your customers to create both the application object and service principal directly in their tenant. Don’t do that.)
Okta
Okta doesn’t have the notion of a tenant-local service principal that links to an external application object. Instead you must create the application object in each tenant manually. Okta calls these objects “app integrations” and there are two equally valid mechanisms for adding them to a tenant.
You can provide your customers with step-by-step instructions for them to manually create an app integration. (Here’s an example you can crib off of.)
You can add your app to the Okta Integration Network (OIN) where your customers can click to add the integration.
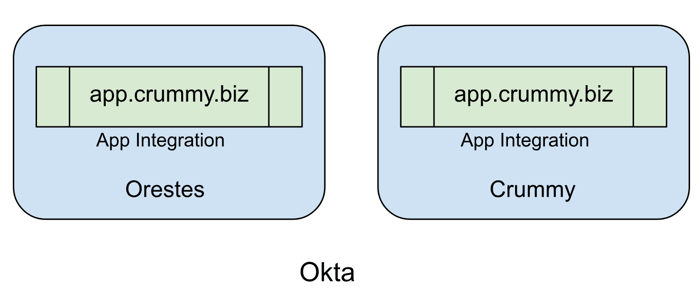
In both cases the end result is that each tenant maintains a distinct representation of your app. In the image above, the Orestes app integration is essentially a re-typed version of the app integration at Crummy. There is no logical relationship between the two, as there is with Entra.
Recommendations
You must create an Entra application registration in order to create and test your code, so do that early. This will also add a service principal to your tenant. When you go live, your customers will reference this very same application object via the service principal created automatically in their tenant by the first (ideally highly privileged) user who logs in.
You do not have to add your app to the Entra App Gallery, but you probably should. For one thing, customers expect it. For another, it makes it easier for the customer to add your app to their application dashboard, My Apps. And finally it will make it easier for them to login; see below.
Okta is similar, except there’s no dynamic service principal creation. You need to add an app integration to your tenant so that you can create and test your app. When you go live, I recommend that you ask your first one or two Okta customers to manually add an app integration to their Okta tenant the same as you did. Once you’ve got all the kinks worked out, go ahead and add your app to the OIN to make adding the integration easier for future Okta customers.
Modeling Accounts and Users
I am a firm believer in the notion that users have accounts, accounts do not have users. However, in the world of single sign-on, accounts most definitely have users. It is strongly suggested that you model this in your database as a one-to-many relationship from accounts (tenants) to users. If your system allows a user to belong to multiple accounts, then model that separately. There’s still just one primary SSO account.
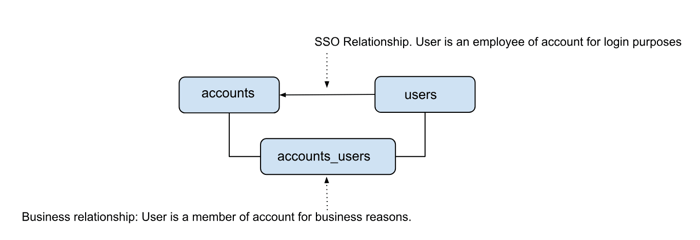
Chickens and Eggs
When an enterprise user wants to login to your app, they have basically two options. One is they can visit your home/login page and click a button that says “Login with Entra” or “Login with Okta”, magic happens, and they are logged in. The other is to use the application launcher/dashboard/portal page that the IdPs make available to their customers. These dashboards consist of a bunch of “tiles”, one for each SSO-enabled app the tenant has added. Users will visit this page and click on your tile to access the app.
But here’s the thing. For OIDC apps, Microsoft only supports “service provider” (SP) initiated SSO, and you, dear reader, are the service provider. When a user at Electra clicks the Crummy tile in their launcher, all it does is link them to the Crummy web site, where they then click the “Login with Entra” button discussed in the previous paragraph. In other words, that “Login with Entra” button is essentially required. Which is okay, since it’s also best practice. Note, Entra does support one-click IdP-initiated SSO, but only for SAML authenticated apps, not OIDC. Go figure.
Okta on the other hand, totally supports IdP-initiated SSO, and I encourage you to use it. When creating an app integration, select “Login initiated by” → “Either Okta or App”, and then provide the URL that will kick off the authorization flow. This is, of course, the same URL that’s behind the “Login with Okta” button. That is, the Okta Launcher is effectively clicking that button for the end user. I don’t know why Microsoft doesn’t do this (but stay tuned).
Moving on. Check out this typical OIDC flow from Entra’s OIDC page.
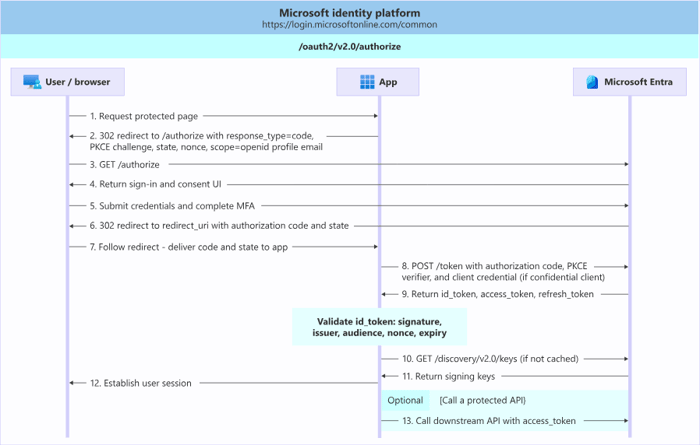
Step 2, “Redirect to /authorize” is all well and good...if we had one tenant and one IdP. That is, if we were building an on-prem app. But we’re not, we’re building a multi-tenant, multi-IdP SaaS app. We have no idea where to send a user that hasn’t logged in yet. This means we have to rely on the user to know who their IdP is. In turn, you will provide a “Login with Entra” and a “Login with Okta” button, and they will click the right one (hopefully).
Now check out the /authorize endpoints for Entra and Okta:
Entra: https://login.microsoftonline.com/{tenant}/v2.0/authorize
Okta: https://{tenant}/oauth2/v1/authorize
What do you sub in for that {tenant} parameter?
For Entra, you substitute the customer’s Entra Tenant ID, a UUID, e.g. d7f8a7e0-4a8b-4229-8804-d56e9c0b1c97.
For Okta, it’s the “issuer” domain, e.g. orestes.okta.com or okta.orestes.com.
Okay, but how do you get those? Well, you need to get them out of band. When you or your customer configure their SSO setup in your system, Crummy, they need to provide you with this identifier. You, presumably, will store it in the database linked to their account.
Fine, but at this point you just have some Internet rando pinging a URL. You don’t know this person’s account (if it even is a person) because they haven’t logged in yet. And you can’t log them in without knowing their account.
Deep sigh
For Entra, this is actually easy to solve because Entra also has a universal /authorize endpoint. Just replace {tenant} with the word “organizations”. (You could also use “common”, but “organizations” is preferred for B2B apps.). That is, when the user hits, say, https://app.crummy.biz/auth/entra (the link behind the “Login with Entra” button), you simply redirect them to https://login.microsoftonline.com/organizations/v2.0/authorize. The user will authenticate to Entra, which will then redirect them back to the callback URI discussed below.
Okta, unfortunately, doesn’t support a common authorization endpoint. When an Okta user visits https://app.crummy.biz/auth/okta, you have no choice but to present the user with a form asking for some kind of account identifier. It’s common to ask for the user’s email address and use that to find the corresponding account in the database.
Remember, though, that Okta supports IdP-initiated SSO. If the user comes to your app from the Crummy tile on the Okta Dashboard, Okta will provide the customer domain in the “iss” (issuer) query string parameter. That is, the dashboard tile will link to https://app.crummy.biz/auth/okta?iss=https://orestes.okta.com. You can now use the “iss” parameter to create the authorization url, e.g., https://orestes.okta.com/oauth2/v1/authorize.
But, hey! Maybe we can get Entra to support IdP-initiated SSO after all. What if we set the Entra application object’s “home page” to https://app.crummy.biz/auth/entra? Given Entra’s support for a universal authorization endpoint, doesn’t that allow one-click login to your app? Indeed it does and you should totally do that.
So one point to Microsoft for supporting a common authorization endpoint and one point to Okta for supporting IdP-initiated SSO. But in the end, you can get both to roughly the same place. If the end-user uses the Crummy tile on their application launcher, they can login with one click from Okta or Entra. Otherwise, they can click a button on your login page, which, sadly, will need to query Okta users for their email or domain name.
Registering your App
Entra
We’ll start by creating an application object in Entra. I will not post step-by-step instructions with screenshots. Those get stale and, frankly, it’s not that complicated. It should be easy enough for you to follow along without all that.
From your Entra ID dashboard, select Manage → App registrations → New registration. Note, do not add an “Enterprise Application”, those are other company’s app registrations, like SalesForce or DropBox.
Give your app a name, e.g. “Crummy”, select the “Multiple Entra ID tenants” account type, and “Allow all tenants”.
Entra will ask you for an optional redirect URI. This is not truly optional, it can just be deferred. The redirect URL is where Entra will send a success or failure notification when the user attempts to login. So select “Web” as an application type and add a URI, such as https://app.crummy.biz/auth/entra/callback.
❗Note, you probably want to create an app registration for your development environment (localhost) first, then add additional registrations for staging and production when you’re ready to test and go live. In this guide we’re just assuming prod. Further note that Entra and Okta don’t actually use this URI per se. They use a redirect URI you will send to them during the authentication process. However, the sent URI must match a stored URI (you can have more than one). Finally, if you don’t know what the callback URI is yet, you can always add/change it later. You’re not done yet. Scroll back to that flow diagram above and check out step 8: POST /token. This is where your app exchanges an authorization code (step 7) for an access token, in both Entra and Okta (and all other IdPs). To “login” to the authorization server, i.e. the IdP, in order to get that token, you need to provide credentials. A client_id and client_secret. The client_id is auto-generated when you register your app, but you need to establish the client secret.
Both platforms support using either a secret string (aka password) or a certificate as a secret. Which should you choose? Well, certs are more secure but secrets are easier. I’ll be using secrets. The Entra UI is moderately clear on how to do this, so go ahead and add a secret now. Just remember what it is.
❗Certs and secrets expire! Generally in a year or two. You MUST not forget to rotate secrets before they expire, otherwise your customers won’t be able to login. A simple tickler entry in your calendar may suffice.There’s still a little more left to do. First, as discussed above, you’re going to want to add a home page to your registration that links to the kickoff-the-flow page in your app: https://app.crummy.com/auth/entra.
Next, you need to find the registration’s corresponding Enterprise Application. This is the service principal that links your tenant (and your customer’s tenants) to the app registration. From the Enterprise Application page select your application, click “Properties”, and change “Visible to users?” to “Yes”. This allows your app to show up in the My Apps page.
Finally, if you don’t already have an Entra user, create one or two and add them as users to the enterprise application (not registration).
BTW, the Entra applications dashboard can be found here: https://myapps.microsoft.com/.
Okta
Creating an app integration in Okta is much the same. Refer back to these instructions for a sample of how to create one in your tenant.
Notably, Okta secrets don’t expire. Okta still recommends rotating them periodically, but you don’t have to. As with Entra, you likely want to create localhost and staging integrations first. You also want to create a dummy user or two and add them to the integration.Adding SSO to your App
Now you need to add some code to your application. I’m not going to show how to do that either. It will differ, obviously, from language to language and framework to framework. But I will provide some important insights.
First, find an OIDC-aware library for your language/framework. There’s no point in doing all this heavy lifting from scratch. In my Elixir Phoenix app, I am happy with this OIDC library from DockYard. There’s also this one from the Erlang Ecosystem Foundation, which looks just as effective.
In your app, you will add two routes for each IdP; one to kick off the flow and one that matches the redirect URI. For example:
https://app.crummy.biz/auth/{idp}
https://app.crummy.biz/auth/{idp}/callback
In both cases, the /auth/{idp} action will build and redirect to the IdP’s /authorize URL with the appropriate query string. The required query string parameters are:
| Parameter | Value | Description |
client_id | Some IdP-specific opaque identifier that points at your app. e.g.: 00001111-aaaa-2222-bbbb-3333cccc4444 or 0aa1111bb2CCCCdd333 | For Entra this is the client ID of your app registration. For Okta it is the client ID of your customer’s app integration. |
response_type | code | Specifies the “authentication flow” and the type of credentials the authorization server returns. For bog standard web apps, we want “code”, which selects the “authorization flow”. Other flows are available that are better suited to mobile apps or SPAs. They are not discussed here. |
redirect_uri | https://app.crummy.biz/auth/{idp}/callback | Where to return success/failure messages. URL encoded. Must match (at least one of) the redirect URIs in the IdP’s representation of your app. |
| scope | openid profile email | A space separated list of OIDC-defined scopes. Each scope requests a certain set of fields (claims) you want the IdP to return. The openid scope is mandatory and returns, among other claims, the “sub” claim which uniquely identifies the user. The email scope is also optional, but you probably want this too. It returns the user’s email address. |
In addition, you want to send along the following
nonce: to prevent replay attacks
state: to prevent CSRF attacks
How to create and use the nonce and state parameters is discussed briefly below.
In the end, you may redirect an Entra user to (for instance):
https://login.microsoftonline.com/organizations/oauth2/v2.0/authorize
?client_id=00001111-aaaa-2222-bbbb-3333cccc4444
&response_type=code
&redirect_uri=http%3A%2F%2Fapp.crummy.biz%2Fauth/entra/callback%2F
&scope=openid profile email
&state=12345
&nonce=67890
Your kickoff function should (must) do one more thing: retrieve and cache the IdP’s “discovery document”. It can be found at /.well-known/openid-configuration and contains information about the IdP’s endpoints, supported scopes, and much more. Your app can then use this to configure itself. Importantly, it also contains a link to the IdP’s public keys that you will want later to verify the returned tokens. Your selected OIDC library should have support for discovery and validation baked in. If it doesn’t, use a different library.
The Callback
When the user is redirected back to their IdP, they will, if not already logged in, login with their corporate credentials and in accordance with corporate best practices regarding password complexity, 2FA, and so on. The IdP will then redirect the user to the provided redirect URI and returns …
…a code!
It does not return the id_token directly. It could, but because we used a response_type of “code”, signaling that we are using the “authorization code flow” and not the “implicit” flow, which is useful for SPAs and mobile apps, and also due to the way we have configured our application objects/integrations, we are getting a code back, which will need to exchange for an id_token. This is a good thing ™. It means the browser doesn’t need to manage any secrets.
You’ll also get a state parameter back, which, if sent in the authorization step, you should validate in the callback that they are identical.
You may also get a failure response instead of a code. This response uses the (mandatory) error and (optional) error_description parameters, which you should be prepared to handle. My experience is that the most common cause of IdP-reported errors is the user not being a member of the authentication group set up by the customer in the IdP. That is, your customer created a “Crummy” group and configured the IdP to only allow members of that group to access the Crummy app, but never added the user to that group.
Token Exchange
It’s now up to you (ideally, your library) to call the IdP’s /token endpoint to exchange the authorization code for a token. This is done by POSTing to the IdP’s token endpoint (same shape as the authorize endpoint, just replace “authorize” with “token”).
I won’t go into detail here, but I will point out that in order to authenticate to the IdP, you will need to send to the /token endpoint, among other things, the client_id and client_secret of your app object/integration and the code you just got from the IdP.
For Microsoft, we only have the one application object. So we can take these two values, client ID and client secret, created when we registered our app, and keep them safely as secrets. I assume you know enough not to put these in your source code.
But for Okta, remember, we have one app integration per customer. This means, you will need to collect from all of your Okta customers, the client_id, client_secret, and issuer (Okta domain)! This is annoying, but there’s no way around it.
The next question is; should you encrypt the client_secret in the database? And the answer is yes! Yes, you should. It’s effectively a password. You also need to take pains to keep the plaintext version from leaking into logs or any client side environment.
When you (or your library) POSTs the code to the /token endpoint, you will get back an access_token and an id_token in JWT format. (You’ll get a refresh_token too, but you probably won’t need that).
ID Token
The id_token will contain all the claims (fields) you are likely to want. By the time you can access it, your OIDC library has likely converted the JWT into your language’s Map/Dict/Hash/Object data type. An Entra ID token in Elixir Map format, for instance, contains, among other things, the following fields:
%{
  "email" => "placey@synclinical.com",
  "name" => "Peter Lacey",
  "sub" => "HQ0__rfqFPOSKBUJAaNTvxo57h9F2ZnjtwQvdBSOlyU",
  "oid" => "ceafee6e-f553-468d-a395-5f90a2e0d893",
  "iss" => "https://login.microsoftonline.com/fa9312c1-ab88-49cc-ca91-6aafb815480a/v2.0",
  "tid" => "fa9312c1-ab88-49cc-ca91-6aafb815480a",
}
The “sub” and “oid” claims both identify the user. The “sub” claim is part of the OIDC spec and supported by both Entra and Okta, it is the IdP’s unique identifier for a user. For Entra, it is only guaranteed to be unique within your application. The Microsoft-specific “oid” claim is unique globally. That is, the “oid” claim is useful if identity crosses system boundaries. In my case it doesn’t, also Okta doesn’t support it, so I use “sub” as a unique user identifier. More on this below.
The “iss” claim identifies the issuer. That is, the IdP that issued the token. The UUID in the example above is Crummy’s tenant ID, which is also in the Entra-specific “tid” claim. I point these out because it’s likely you'll want to use one of these to to retrieve account information from the database.
With this information in hand, you should now do the following.
First, validate the ID token. (Most writeups say you MUST do this, but it seems to me that if you’re trusting the discovery document from the IdP and the public keys from the IdP, you’re safe in trusting the tokens too. Nevertheless, it’s easy enough to do, so I do it and sleep better for it.) A good OIDC library will do some of the validation for you. Validation means verifying, at a minimum, that the token was signed by the IdP, the token is meant for your app, and that it hasn’t expired.
We already mentioned validating the state parameter in the URL, but the nonce comes back as an ID token claim. If you set it in the initiation phase, validate it now.
Next, apply your own business validation. Does your app require an email field? If so, keep in mind that it can be blank, so you want to reject the authentication attempt if it is. You also want to check if the associated tenant is even a customer of yours by comparing the iss claim (or the unique part of it) to the issuer field you should have in your database. Can your app deactivate an account? If so, check that. Do you have per-seat licensing? Check that too. And so on.
Access Token
An access token is a JWT, which from our point of view is essentially opaque. It will allow us to make additional calls to IdP endpoints. However, if all you really wanted was the user’s name and email (and ID), then you’re done and you can ignore the access token.
Note, though, that both Entra and Okta make an endpoint available to retrieve additional user information like phone numbers, title, preferred language, or a picture, if these things are available. You can use the access token and the “userinfo_endpoint” from the discovery document to get these.
Log Them In
At this point you have a valid request and an authenticated user. What you do next is up to you. However, I will point out some complexity that you will likely need to deal with.
First, let me show you what I think a row in the users table should look like at a minimum.
Column | Type | Description |
id | bigint, not null | Your PK |
tenant_id | bigint | FK back to the account |
provider_id | character varying(255) | The IdP’s unique user identifier |
citext, not null | Email address (case insensitive) |
Obviously, you’ll have columns for the user’s name and many other things, but they are not relevant to the discussion. Just note that we have a direct link to the user’s employer (tenant_id) that points back to the SSO-enabled account and we have a provider_id, which is the unique identifier that the IdP maintains for this person. Note also that those can be null, since users may exist before your customer enables SSO. (At the very least, you will probably add an administrator user as part of your onboarding process.) And that implies the need for a unique and not null identifier, email.
You want to retrieve the now authenticated user from your database by their IdP-specified unique identifier, that is, the sub claim. But in order to find any unlinked users, you need the email address in your query as well. That is, SELECT * FROM users WHERE provider_id = ’1234’ OR email = ’abc@def.ghi’.
I strongly encourage you to automatically create user accounts for authenticated users that don’t exist in your database yet. After all, if the authorization server has authorized this person to access your app, well then, so be it. This means that the query to return a user cannot contain any other conditional logic. If the user exists, they must be returned. Otherwise, you run the risk of creating a second instance of the user or raising an exception. When creating the user, besides setting their name and email, also set their provider_id to the value of the sub claim and link them back to the tenant.
If the user does exist, update all the information that can change over time: name and email mostly, but you may be capturing more than that.
Finally, given that you can only access this user by a strong identifier, you need to apply any business logic validation last, just before you log them into your system.
If you’re onboard with all that. Here’s how the callback function should look. You’ll have to translate from Elixir as best you can and flesh out the function calls in your head.
defp process_callback(conn, config, params, account \\ nil) do
  Logger.info("Beginning OIDC callback phase for #{config[:provider]}.")

  with true <- valid_state_token?(conn, params["state"]),
        {:ok, tokens} <- fetch_tokens(config, params["code"]),
        {:ok, claims} <- fetch_claims(config, tokens),
        {:ok, tenant} <- maybe_get_account(account, claims["iss"], claims["email"]),
        :ok <- validate_nonce(conn, claims["nonce"]) do
    Logger.info("OIDC tokens and claims are valid. Tenant found.")

    # Don’t let PII leak into the logs
    redacted_email = Common.redacted_email(claims["email"])
    Logger.info("OIDC attempt to login to #{tenant.name} by #{redacted_email}.")

    case Users.get_user_by_provider_id_or_email(claims["sub"], claims["email"]) do
      nil ->
        Logger.info("OIDC: #{redacted_email} does not exist. Adding user.")

        {:ok, user} = Accounts.add_user_from_sso(tenant.id, claims)

        UserAuth.log_in_user(conn, user, %{})

      user ->
        Logger.info("OIDC: #{redacted_email} found. Updating user record.")

        if Users.active_for_tenant?(user, tenant.id) do
          Users.update_user_profile_from_sso(user, claims)

          UserAuth.log_in_user(conn, user, %{})
        else
          fail(conn, "#{redacted_email} is not an active employee of #{tenant.name}")
        end
    end
  else
    {:error, reason} -> fail(conn, reason)
  end
end

defp fail(conn, reason) do
  Logger.error("OIDC: Authentication error: #{inspect(reason)}")

  conn
  |> put_flash(:alert, "Authentication failed.")
  |> redirect(to: ~p"/")
end
That’s it. Good luck. Feel free to ping me at placey@synclinical.com if you want to discuss or correct any of this.